Dot Grid Weekly Planner Layouts
A weekly page is the part of a planner you open most often. On dot grid paper you can draw one in ten minutes, and if you count the squares first, every box comes out the same size.
Quick answer
Leave 2 squares of margin on every side, keep 3 squares at the top for the dates, and divide the rest. On A4 dot grid (5mm) that leaves 37 × 52 squares, enough for seven days of 7 squares each. On US Letter it leaves 39 × 48 squares, enough for seven days of 6 squares each, or eight boxes of 11 squares in two columns.
Count in squares, not dots
A square here means the gap between two neighboring dots: 5mm on the dot grid paper on this site. A sheet of A4 has 42 × 60 dots, which makes 41 × 59 squares. A sheet of US Letter has 44 × 56 dots, which makes 43 × 55 squares.
Printers rarely print to the very edge, so the outer dots can come out faint or missing. Leaving 2 squares free on each side solves this and gives the page a clean border. The layouts below all start from this usable area.
| A4 (5mm dots) | US Letter (5mm dots) | |
|---|---|---|
| Squares on the sheet | 41 × 59 | 43 × 55 |
| Usable area after a 2-square margin | 37 × 55 | 39 × 51 |
| Below a 3-square header | 37 × 52 | 39 × 48 |
| Usable area turned sideways | 55 × 37 | 51 × 39 |
What you need
- Printed dot grid sheets. The A4 and US Letter PDFs have dots 5mm apart. Print at 100% ("Actual size"), or the squares will not be 5mm and the counts below will not fit.
- A pencil to mark the corners before you commit.
- A fine pen, 0.3 to 0.5mm, and a short ruler. Lines drawn from dot to dot look straight even without a ruler.
- A ring binder if you print a sheet each week. Punch the holes on the left edge, inside the margin.
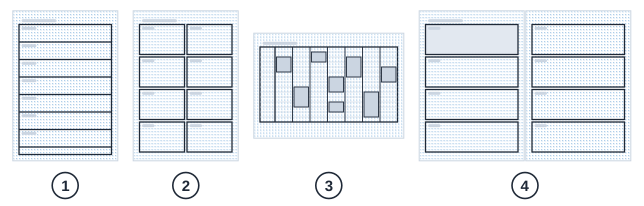
Layout 1: seven days in a list
The simplest weekly page: one strip per day, from top to bottom. It suits weeks with a lot of short tasks and few appointments.
- Write the dates of the week in the 3-square header.
- On A4, draw a horizontal line every 7 squares: seven strips use 49 of the 52 squares, and the last 3 make a line for notes. On US Letter, draw a line every 6 squares: seven strips use 42 of the 48 squares, which leaves 6 squares for notes.
- In each strip, write the day name on the first row and leave the rest for tasks. One task per row of dots gives you 6 tasks a day on A4 and 5 on US Letter.
Layout 2: eight boxes
Two columns of four boxes: seven for the days and an eighth for notes, goals or a habit tracker. This is the most common weekly spread in dotted journals, because every day gets the same space and the week fits on one page.
| A4 | US Letter | |
|---|---|---|
| Box width | 18 squares (2 boxes + 1 gap = 37) | 19 squares (2 boxes + 1 gap = 39) |
| Box height | 12 squares (4 boxes + 3 gaps = 51) | 11 squares (4 boxes + 3 gaps = 47) |
| Gap between boxes | 1 square | 1 square |
Mark the four outer corners in pencil first, then the gaps. If the last box ends exactly on the counted dot, the rest of the page will line up too.
Layout 3: time blocks on a sideways sheet
For weeks full of appointments, give each day a column and each hour a row. A dot grid looks the same both ways, so you do not need a special landscape sheet: turn the printed page on its side.
- Turn the sheet so the long side is horizontal and keep a 3-square header for the dates.
- Draw seven day columns of 7 squares each. On A4 they take 49 of the 55 squares across, so the first 6 squares become a time column. On US Letter they take 49 of 51, which leaves a narrow 2-square time column for the hour numbers.
- Give each hour 2 squares of height. Fifteen hours, from 7:00 to 22:00, take 30 squares, which fits under the header on both paper sizes with a few squares to spare for a weekly to-do line.
- Shade or outline each appointment as a block that covers its hours. A free afternoon is easy to spot at a glance.
Layout 4: one week on two pages
If one page feels cramped, spread the week over two sheets that face each other in the binder. Each page holds four boxes stacked from top to bottom: goals or notes and the first three days on the left, the remaining four days on the right.
Under the header, each box is 12 squares high on A4 and 11 squares on US Letter, with a 1-square gap between boxes. That is the same height as in Layout 2, but each box now runs the full width of the page, so a day can hold a short schedule on the left and tasks on the right.
Add a habit tracker
The eighth box of Layout 2 is the right size for a weekly habit tracker. Use one row per habit and one square per day: 7 squares for the days, about 10 squares for the habit names, and a square of space between them. That is 18 squares on A4, exactly the width of the box, and 1 square spare on US Letter. With 2 rows per habit for easier filling in, the box holds five habits under a 2-square title on A4 (12 squares high) and four on US Letter (11 squares high).
A quick key for tasks
Short symbols in front of each entry make a full week easy to scan. A widely used set:
| Symbol | Meaning |
|---|---|
| • | A task |
| × | A task that is done |
| > | A task moved to next week |
| ○ | An event or appointment |
| – | A note |
A ten-minute weekly routine
- At the end of the week, look through the old page. Cross out what is done and mark everything else with >.
- Print or take a new sheet and draw the layout for the coming week. With the counts above, this takes about ten minutes.
- Copy the moved tasks into the new week, then add appointments and deadlines from your calendar.
- Pick two or three priorities for the week and write them at the top or in the notes box.
Common mistakes
- Printing at "Fit to page". The sheet shrinks slightly, the squares are no longer 5mm, and a layout planned on paper of the right scale runs short. Print at 100%.
- Starting to draw at the top edge. Work out where the bottom of the last box lands first. A layout that runs out of dots halfway down the last day cannot be saved.
- Inking before counting. Mark the corners in pencil, check the count, then draw in pen.
- Making every week different. Changing the layout each week costs time. Keep one that works and change it only when your weeks change.
Where to go next
If 5mm dots feel tight for your handwriting, the generator draws dot grid paper at any spacing from 4 to 25mm; recount the squares for the new size. For notes that are mostly text, plain lined paper is easier, and the guide to lined, graph and dot grid paper compares the three.
Frequently asked questions
How many dots are on a sheet of A4 dot grid paper?
With dots 5mm apart, an A4 sheet holds 42 × 60 dots, which makes 41 × 59 squares. A US Letter sheet holds 44 × 56 dots, or 43 × 55 squares.
What is the best dot spacing for a weekly planner?
Five millimeters, the spacing of most dotted notebooks. It gives one comfortable row of handwriting per row of dots and enough squares to divide a page into seven or eight boxes.
Should a weekly spread take one page or two?
One page is enough if most entries are short tasks. Use two pages, four boxes on each, if you write a schedule for each day or keep longer notes.
How do I make all the boxes the same size?
Count before you draw. Subtract the margins, the header and the gaps from the squares on the page, divide the rest by the number of boxes, and mark each corner in pencil before you ink.
Can I print a dot grid sheet in landscape?
Yes. A dot grid is the same in both directions, so you can print the normal sheet and turn it on its side. On A4 that gives 59 × 41 squares, on US Letter 55 × 43.