How to Draw a Floor Plan on Graph Paper
A scale drawing of a room takes about an hour and one sheet of graph paper. It shows whether the sofa fits before you carry it up the stairs.
Quick answer
On 1/4 inch graph paper, let one square stand for 1 foot. On 5mm graph paper, let one square stand for 25cm. Measure every wall, draw the outline by counting squares, mark the doors and windows, then move paper cutouts of your furniture around the plan.
What you need
- Graph paper. Two sheets of the same grid: one for the plan, one for furniture cutouts. Print graph paper with 1/4 inch squares on US Letter or 5mm squares on A4.
- A tape measure of at least 25 feet (8m), or a laser measure.
- A pencil and an eraser for the first pass, and a fine pen for the final lines.
- A ruler for straight walls, and scissors for the cutouts.
Choose a scale
The scale is what one square on the paper stands for in the room. Pick the one at which your longest wall fits on the sheet with two or three squares to spare on each side for measurements.
| Graph paper | One square equals | Scale | Fits on one sheet | Good for |
|---|---|---|---|---|
| 1/4 inch, US Letter | 1 foot | 1:48 | 33 × 43 feet | One room or a small apartment |
| 1/4 inch, US Letter | 2 feet | 1:96 | 66 × 86 feet | A whole floor of a house |
| 5mm, A4 | 25cm | 1:50 | 10.25 × 14.5m | One room or an apartment |
| 5mm, A4 | 50cm | 1:100 | 20.5 × 29m | A whole floor of a house |
| 1cm, A4 | 50cm | 1:50 | 9.5 × 14m | A plan that is easy to read and label |
One square to one foot on 1/4 inch paper is the scale architects in the United States use for house plans, written as 1/4" = 1'-0". The metric scales 1:50 and 1:100 are the standard ones elsewhere. Write the scale in a corner of the sheet as soon as you choose it.
Measure the room
- Sketch the shape of the room freehand on scrap paper. It does not need to be neat; it is where you write the numbers.
- Measure each wall along the floor, from corner to corner, and write the length beside that wall on your sketch.
- Measure the full length and the full width of the room once more as a check. The parts of each side should add up to the total.
- For every door, measure the width of the opening and its distance from the nearest corner. Note which way the door swings.
- For every window, measure its width and its distance from the nearest corner.
- Add the fixed things furniture has to avoid: radiators, vents, closets, columns and electrical outlets.
Use one unit for everything, either inches or centimeters, and convert once at the end. In a rectangular room, opposite walls should match to within about an inch (2cm). If they do not, measure both diagonals: when the diagonals are equal, the corners are square, and when they differ, the room is slightly skewed and the drawing can only be approximate.
Draw the plan
- Start with the longest wall. Draw it along a grid line near the bottom of the sheet, leaving a few empty squares below it.
- Count squares for each wall in turn and draw the outline lightly in pencil. Round each measurement to the nearest half square, which is 6 inches at one square to a foot.
- Check that the outline closes. If the last wall ends one square away from the first, recount before going further.
- Mark each door as a gap in the wall. Add a quarter circle from the hinge side to show the space the door sweeps as it opens.
- Mark each window as two thin lines inside the wall.
- Draw the fixed features, then write the wall lengths outside the outline.
- Go over the walls in pen with a heavier line, so they stand out from the furniture you add later.
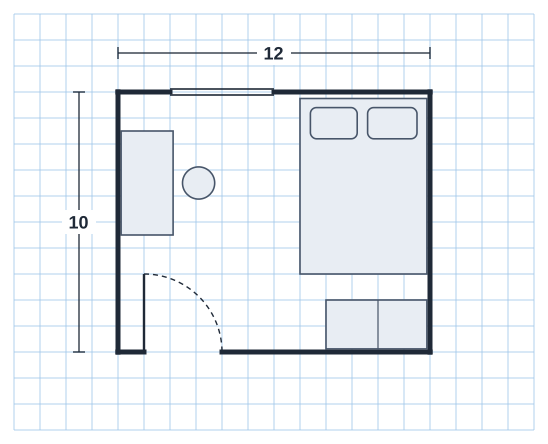
Symbols used on floor plans
| Feature | How to draw it |
|---|---|
| Wall | A heavy solid line |
| Door | A gap in the wall, a straight line for the open door and a quarter circle for its swing |
| Window | Two thin parallel lines within the wall |
| Sliding door | Two thin overlapping lines within the wall, with no arc |
| Stairs | A row of narrow rectangles with an arrow pointing up the stairs |
Test the furniture with cutouts
On the second sheet, draw each piece of furniture as a rectangle at the same scale, label it and cut it out. Moving paper around the plan is faster than erasing, and it shows at once what does not fit. Measure your own furniture where you can; these typical sizes are a starting point.
| Furniture | Typical size (US) | In centimeters | Squares at 1 square = 1 foot |
|---|---|---|---|
| Twin bed | 38 × 75 in | 97 × 191 | About 3 × 6 |
| Full (double) bed | 54 × 75 in | 137 × 191 | 4.5 × 6 |
| Queen bed | 60 × 80 in | 152 × 203 | 5 × 6.5 |
| King bed | 76 × 80 in | 193 × 203 | 6.5 × 6.5 |
| Three-seat sofa | 84 × 36 in | 213 × 91 | 7 × 3 |
| Desk | 48 × 24 in | 122 × 61 | 4 × 2 |
| Dining table for six | 72 × 36 in | 183 × 91 | 6 × 3 |
A layout works when people can move through it. These common rules of thumb are easy to check by counting squares:
- Leave about 3 feet (90cm) for the main path through a room.
- Leave at least 2 feet (60cm) beside a bed.
- Leave about 3 feet (90cm) behind a dining chair, so it can be pulled out.
- Keep the arc of every door clear, and leave room to open drawers and wardrobe doors.
Common mistakes
- Forgetting to write the scale. A plan without its scale is hard to use a month later.
- Mixing units. Feet on one wall and inches on another is the usual cause of an outline that does not close.
- Drawing furniture from memory. A sofa is often 6 inches deeper than it looks.
- Leaving out the door swing. A wardrobe that fits the wall can still block the door.
- Printing with "Fit to page". The squares shrink by a few percent. Print at 100% so each square keeps its size; see how to print at the right size.
Other grids for plans
For a plan that will be photocopied or scanned, choose gray lines for the grid, so the grid stays lighter than your drawing. The graph paper page has gray versions and larger squares of 1cm, 1/2 inch and 1 inch. To show a room in three dimensions, redraw the plan on isometric paper. For any other square size, the free generator draws a grid from 4 to 25mm.
Frequently asked questions
What scale should I use for a floor plan on graph paper?
On 1/4 inch graph paper, use one square = 1 foot (scale 1:48); a US Letter sheet then covers 33 × 43 feet. On 5mm graph paper, use one square = 25cm (1:50), which covers 10.25 × 14.5m on A4. For a whole house, double it: one square = 2 feet, or one square = 50cm.
How do I draw an L-shaped room?
Treat it as two rectangles that share a side. Measure all six walls, draw the larger rectangle first, then add the smaller one. Check the result by measuring the full length and width of the room and counting the same distance on the plan.
How accurate does a hand-drawn floor plan need to be?
For arranging furniture, the nearest half square is enough: 6 inches at one square to a foot, or about 12cm at one square to 25cm. For ordering fitted furniture, flooring or kitchen units, measure again on site and rely on the numbers, not on the drawing.
Can I draw a metric plan on 1/4 inch graph paper?
You can, but the numbers are awkward, because a 1/4 inch square is 6.35mm. Use 5mm or 1cm graph paper for metric plans, so that each square is a round number of centimeters.
How do I show the thickness of walls?
For a single room you do not need to: draw the inside face of each wall as one heavy line. For a whole floor, draw interior walls about half a square thick at one square to a foot, since a typical interior wall is 4 to 5 inches thick.